
As mentioned in my first post, I am a rusty programmer, fairly new to Unity and I don't believe in copying code willy-nilly without understanding what the actual code doing and more importantly the method/logic.
I wasn't planning to do any tutorial like posts on this blog, but what I thought would be rather simple to achieve, actually took me a lot longer than expected. I am hoping this might save someone some time.
Player in the Field of View: Player in View Distance:Player Spotted - We are within the field of view and we are in within the enemies view distance and the enemy can see the Player.
Player in the Field of View: Player in View Distance:Player Not Spotted - We are within the field of view and we are in within the enemies view distance and the enemy can not see the Player.


In the above picture, we can see our player is hiding behind the wall, the console is showing (as it should )
Player in the Field of View: Player in View Distance:Player Not Spotted
Now to break down what is happening.
The first test we do, is whether the player is in the field of view. to do this, we use Vector3.Angle to work out the angle between the enemy and the player. We then test this to see if this value fits within the field of view we have assigned the enemy. Note, and this is what confused me at first, the angle Vector3 returns is not normalised and returns the smaller of the two angles, so it can never be higher than 180. To address this in our code, we divide our fieldofView value by two
If this is still not making much sense, I suggest adding to the code
Debug.Log(Vector3.Angle (rayDirection, transform.forward));
and moving the player around to see the result.
The second test we do is see if the player is within our view range. To do this we use a Raycast (the red line in the picture) to the distance of our player view and see if it hits the player. If it does, then we know the player is in view. Play around with the field distance value to see this in action.
The third test we do (and this is what was doing my head in!) is to test what we are actually looking at is the player. To do this, we return the tag of the collider object and if it is tje player, then we know we are looking at the player.
Now, the reason I believe this was doing my head in, is down to the fact that the Raycast does not stop when it hits a collider it keeps on going. You need to be careful the order you do the above steps, but I have found doing them this way, gives a result that is traceable in terms of understanding.
To better demonstrate this, add a few more cubes around the playing area. Add them unique tags ie left wall, right wall and add the following code
I wasn't planning to do any tutorial like posts on this blog, but what I thought would be rather simple to achieve, actually took me a lot longer than expected. I am hoping this might save someone some time.
About:
What I wanted to do was to create a very basic to understand Enemy field of vision script. which I could break at each step, look at the values before moving to the next step. I did plenty of google searching and came across a few problems;- Some awfully out of date code/examples.
- Code examples not in C#
- Maths that is not meant for us mere mortals.
- Some threads posted to other threads which no longer existed or I ended up in a thread inception.
- Some threads broke down into discussions about the benefits and advantages of various methods without coming to any conclusion.
- Some just posted snippets of code, without any of the dependencies.
This example is only concerning itself with the logic. I did not put it together with any regards in terms of performance - I am not qualified to answer that.
What it does:
It gives the enemy a field of vision and a range of vision. It returns to the console the following results as a text string;
Player in the Field of View - We are within the enemies field of view
Player not in Field of View - We are not within the enemies field of view.Player in the Field of View - We are within the enemies field of view
Player in the Field of View: Player in View Distance:Player Spotted - We are within the field of view and we are in within the enemies view distance and the enemy can see the Player.
Player in the Field of View: Player in View Distance:Player Not Spotted - We are within the field of view and we are in within the enemies view distance and the enemy can not see the Player.
Step One: Set UP
- Create a capsule and call it Player
- Create another capsule and call it Enemy
- Create a plane, under transform, set the x scale to 10 and the Z scale to 10
- Create a cube, under transform, set the x scale to 1, the y scale to 3, and the z scale to 5
- Drag the main camera under the player object and position it above the player.
- Arrange the objects roughly as in the picture below. (enemy is coloured white, player is colored green, the cube white and the plane black. This was done manually be creating materials and dragging them onto their objects.).

Step Two: Player SetUp
- Set the Tag to Player
- Add a Rigidbody and a Capsule Collider
- Under Rigidbody, untick gravity and under constraints freeze rotation x,y,z(to avoid any weird movements)
- Add a script called PlayerMovement and add in the following code.
 using UnityEngine;
 public class PlayerMovement : MonoBehaviour
 {
      public float speed = 6f;      // The speed that the player will move at.
      Vector3 movement;          // The vector to store the direction of the player's movement.
      Rigidbody playerRigidbody;     // Reference to the player's rigidbody.
      void Awake ()
      {
           // Set up references.
           playerRigidbody = GetComponent <Rigidbody> ();
      }
      void FixedUpdate ()
      {
           // Store the input axes.
           float h = Input.GetAxisRaw ("Horizontal");
           float v = Input.GetAxisRaw ("Vertical");
           // Move the player around the scene.
           Move (h, v);
      }
      void Move (float h, float v)
      {
           // Set the movement vector based on the axis input.
           movement.Set (h, 0f, v);
           // Normalise the movement vector and make it proportional to the speed per second.
           movement = movement.normalized * speed * Time.deltaTime;
           // Move the player to it's current position plus the movement.
           playerRigidbody.MovePosition (transform.position + movement);
      }
 }
Step Three: World SetUp
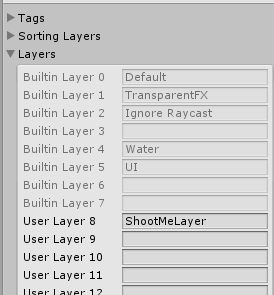
- Set up a new Layer Called ShootMeLayer
- Set the layer on the Player and Cube to ShootMeLayer
Step Four: Enemy SetUp
1. Add a script and call it FieldOfVisionTest and add the following code.
 using UnityEngine;
 using System.Collections;
 public class FieldOfVisionTest : MonoBehaviour {
      /*
       * *****************************************************************************
       * Author:RSJS
       * web:https://intotheeaglesnest.blogspot.co.uk/
       * Description: Simple script to understand an enemy AI sight approach. This script
       * gives the enemy a field of view and a view range. it returns the result as a string
       * and displays it in the debug.console.
       * Depend: For the raycast, the items the enemy can "See" should be on a layer called
       * ShootMeLayer
       * *****************************************************************************
      */
      public int FieldOfView = 120; //enemy field of view
      public int ViewDistance = 10; //enemy view distance
      private Transform playerTrans; // used for the player position
      private Vector3 rayDirection; //used for the ray casting
      private string ViewResult; //Used for storing result of the view text
      int ShootableMask; // Mask for shooting things.
      void Awake ()
      {
           playerTrans = GameObject.FindGameObjectWithTag ("Player").transform; // so the enemy knows where the player is
           ShootableMask = LayerMask.GetMask ("ShootMeLayer"); // when ray casting only look for objects on this level
      }
      // Update is called once per frame
      void FixedUpdate () {
           ViewResult = ""; // Clear out our result each time
           LookForEnemy (); // Call our look for the enemy script
           onDrawGizmos (); // For debugging purpozes
           Debug.Log(ViewResult); //print to the console the result of our look for enemy
      }
      void LookForEnemy ()
      {
           //Get direction from player to and enemy
           rayDirection = playerTrans.position - transform.position;
           // Test to see if the enemy is in the view range.
           if ((Vector3.Angle (rayDirection, transform.forward)) <= (FieldOfView * 0.5f)) {
                //Yes, player is in the view range
                ViewResult = ViewResult + "Player In Field of View";
                //Now, test with a raycast if the player is with the view distance
                RaycastHit hit;
                if (Physics.Raycast (transform.position, rayDirection, out hit, ViewDistance,ShootableMask))
                {
                     Debug.DrawLine (transform.position, playerTrans.position, Color.red); //For debugging
                     if (hit.distance <=ViewDistance)
                     {
                          //Yes, player is in viewing distance
                          ViewResult = ViewResult + ":Player In View Range";
                          //Now test to see if what we are looking for is indeed the player
                          if (hit.collider.tag== "Player") {
                          //     Yes, Enemy is in sight
                               ViewResult = ViewResult + ":Player Spotted";
                          }
                               else
                                    {
                               //No enemy is being blocked
                               ViewResult = ViewResult + ":Player Not Spotted";
                                    }
                     }
                }
           } else {
                //player not in view range
                ViewResult = "Player Not In Field of View";
           }
      }
      void onDrawGizmos()
      {
           //not my code, but gives an apx view of the field of sight. would love to know a better approach
           if (playerTrans == null)
                return;
           Vector3 frontRayPoint = transform.position + (transform.forward * ViewDistance);
           // apx persepctive
           Vector3 LeftRayPoint = frontRayPoint;
           LeftRayPoint.x += FieldOfView * 0.5f;
           Vector3 RightRayPoint = frontRayPoint;
           RightRayPoint.x -= FieldOfView * 0.5f;
           Debug.DrawLine (transform.position, frontRayPoint, Color.green);
           Debug.DrawLine (transform.position, LeftRayPoint, Color.green);
           Debug.DrawLine (transform.position, RightRayPoint, Color.green);
      }
 }
Running the Code
Make sure you have the console visible, also note I have moved the wall in the below screenshot. I highly recommend moving the objects and player around when playing with the code to understand it.
In the above picture, we can see our player is hiding behind the wall, the console is showing (as it should )
Player in the Field of View: Player in View Distance:Player Not Spotted
Now to break down what is happening.
The first test we do, is whether the player is in the field of view. to do this, we use Vector3.Angle to work out the angle between the enemy and the player. We then test this to see if this value fits within the field of view we have assigned the enemy. Note, and this is what confused me at first, the angle Vector3 returns is not normalised and returns the smaller of the two angles, so it can never be higher than 180. To address this in our code, we divide our fieldofView value by two
<= (FieldOfView * 0.5f))
If this is still not making much sense, I suggest adding to the code
Debug.Log(Vector3.Angle (rayDirection, transform.forward));
and moving the player around to see the result.
The second test we do is see if the player is within our view range. To do this we use a Raycast (the red line in the picture) to the distance of our player view and see if it hits the player. If it does, then we know the player is in view. Play around with the field distance value to see this in action.
The third test we do (and this is what was doing my head in!) is to test what we are actually looking at is the player. To do this, we return the tag of the collider object and if it is tje player, then we know we are looking at the player.
if (hit.collider.tag== "Player") {
To better demonstrate this, add a few more cubes around the playing area. Add them unique tags ie left wall, right wall and add the following code
Debug.Log(hit.collider.tag);
And if you are feeling brave, move around the order of tests and see what results you get and see why it can get confusing!
Notes & Conclusion
I don't quite understand why at the moment, but when I have tried this on some character assets, it has not worked and the reason appears to be, that the Raycast has been hitting the floor. (this is also the reason I believe I have had some problems with other tutorials out there) . To correct this, I found changing the y values on the transform.position and player positions has worked.
This is also not the approach I am using in my game, instead, I am using Physics.OverlapSphere and an adaption of the code based on the 2D solution listed here , the reason for this, when writing the actual code for my game, after going through all the above, using OverlapSphere comes across as a cleaner solution it also allows us to do a few other things I am planning.
I hope though, that the above is of use to someone in terms of getting an understanding.
Comments
Post a Comment